In 2008, an expedition led by the not-for-profit Finding Sydney Foundation and shipwreck hunter David Mearns commenced searching for the shipwreck sites of both Sydney and Kormoran. The survey area was defined primarily by archival accounts of the battle related by Kormoran’s officers and crew during interrogation. A particularly valuable piece of information was the coordinates provided by Detmers to Royal Australian Navy officials in 1941. Kormoran’s commander also took extraordinary measures to preserve his report of the battle, which he kept hidden within a German-English dictionary given to him while he was a prisoner of war. This dictionary was later passed on to Detmers’ nephew, and its existence uncovered and verified by Sydney–Kormoran historians Barbara Winter and Wes Olson.
Navigational display aboard the research vessel Skandi Protector shows its position over Sydney's wreck site. Image: WA Museum and Curtin University. Copyright WA Museum.
The German raider’s wreck site was located on 12 March, and Sydney was discovered four days later, 21 kilometres away on a southeast bearing in approximately 2,500 metres of water. Sydney’s bow section broke away as the ship sank and came to rest upside-down approximately 500 metres northwest of the rest of the hull, which sits upright on the seabed. Video and still footage acquired by a remotely operated vehicle (ROV) revealed extensive battle damage to the Australian cruiser’s bridge and turrets (among other areas), and corroborated German accounts of the engagement. The imagery also revealed both Sydney and Kormoran retained an excellent overall state of preservation. Both shipwrecks were subsequently listed as protected archaeological sites under the Commonwealth Historic Shipwrecks Act (1976) and placed on the Australian National Heritage List in March 2011.
Sydney’s B turret, clearly showing the point of impact from one of Kormoran’s shells. Image: WA Museum and Curtin University. Copyright WA Museum.
2015 Archaeological Survey
A joint project led by the Western Australian Museum and Curtin University returned to Sydney and Kormoran in April 2015 to archaeologically document both sites with ROV-mounted 3D imaging technology. High definition video and still imagery of Sydney has revealed additional insights about the last moments of the ship, including the presence of a previously-undocumented 15-centimetre shell hole through the bridge at the compass platform.
Video of the 2015 expedition to survey the historic World War II shipwrecks of HMAS Sydney (II) and the German raider HSK Kormoran. Video: WA Museum and Curtin University. Copyright WA Museum.
This feature supports the theory that the cruiser’s bridge was destroyed in the opening moments of the engagement, which almost certainly resulted in the loss of command structure and ability to effectively return fire. Another shell struck just beneath Sydney’s Director Control Tower, immobilising it and either injuring the crewmen within or killing them outright. The front of the cruiser’s B turret exhibits a single hole where a 15-centimetre shell penetrated it before detonating. Half of the turret’s roof is clearly absent, and confirms German accounts of the event.
Multi-beam sonar image of Sydney's main wreck site. The vessel’s stern is at lower left. Image: WA Museum and Curtin University. Copyright WA Museum.
Over 40 large-calibre shell impacts were noted along Sydney’s port side alone, attesting to the accurate and devastating fire of Kormoran’s guns at the beginning of the battle. Another 46 hits were documented along the starboard side, and provide evidence of the withering fire the raider poured into Sydney as the two ships moved away from one another. The cruiser’s X turret, which responded so rapidly and accurately during the engagement, was later heavily damaged by a 15-centimetre shell. Perhaps the most extensive—and ultimately fatal—damage to Sydney was caused by the torpedo that struck just forward of A turret. The resulting explosion tore hull plates apart, and caused internal supporting structure to buckle. Incredibly, the cruiser’s bow remained in place, but just barely. Eventually, the sheer volume of water rushing in through the breach may have caused catastrophic failure of the watertight bulkhead separating the bow from the rest of the hull. This in turn almost certainly caused Sydney to sink quickly, and the bow section forward of the torpedo damage was wrenched away as the ship descended to the seafloor.
An ROV illuminates a spare wing float from Sydney's Supermarine Walrus amphibious aircraft. Image: WA Museum and Curtin University. Copyright WA Museum.
Within the debris field around Sydney are poignant reminders of the crewmen who served and ultimately died aboard the vessel, including leather boots, helmets and gas masks. The presence of a Carley float and most of the ship’s boats in the debris field strongly suggest they were not launched before the cruiser sank—either because they or their launching apparatus were too heavily damaged, too many crewmen were dead or incapacitated to successfully deploy them, or Sydney’s loss when it finally happened was rapid and catastrophic. Other unique aspects of the shipwreck, including evidence of its dazzle camouflage paint scheme, were preserved and also noted during the survey.
A Carley float located within the debris field surrounding the Sydney wreck site. Image: WA Museum and Curtin University. Copyright WA Museum.
In contrast to Sydney, which is separated into two discrete and largely intact components that are a relatively short distance apart, Kormoran’s wreck site reveals the devastating effects of the detonation of the vessel’s mine store. The bow section is mostly complete and positioned upright on the seabed, while the remainder of the ship’s hull was blown apart and formed a massive debris field.
An ROV documents mangled wreckage within Kormoran's massive debris field. Image: WA Museum and Curtin University. Copyright WA Museum. Image: WA Museum and Curtin University. Copyright WA Museum.
Among new findings during the 2015 survey was Kormoran’s bridge, which is positioned in the approximate centre of the debris field and lying inverted on the seafloor. Two of the raider’s PAK 36 guns are still attached to this section of the superstructure, and would have inflicted some of the most devastating fire against Sydney in the opening moments of the battle.
One of Kormoran’s PAK 36 guns suspended from remnants of the raider’s inverted bridge. Image: WA Museum and Curtin University. Copyright WA Museum.
Also littered among Kormoran’s fragmented remnants are a host of hazardous items, including ammunition and unexploded mines—many of which have been distorted by the extreme pressure exerted by seawater at such great depths.
An unarmed mine lies within the shattered remnants of Kormoran’s hull. Image: WA Museum and Curtin University. Copyright WA Museum.
For all the devastation, elements of Kormoran survived its loss and, like much of Sydney’s wreck site, are immaculately preserved. For example, the glacis plate on one of the raider’s deck guns is still emblazoned with a hand-painted skull and crossbones.
One of Kormoran’s deck guns, featuring hand-painted graffito on its glacis plate. Image: WA Museum and Curtin University. Copyright WA Museum.
Accompanying this decoration is the hand-painted German phrase ‘Linda bringt das Glück dem Feind Verderben!’ (Linda brings luck. To the enemy ruin!). Even more remarkable graffito was discovered within the remnants of Kormoran’s gunrooms. The raider’s victims and their respective tonnages were hand-painted on two separate gunroom bulkheads and are listed in the order in which they were attacked. The graffito adds a new human dimension to the interpretation of shipboard life aboard Kormoran, and the way the crew perceived their role as wartime commerce raiders. It also provides an indication of the attitude the crew adopted in their final battle against Sydney.
Graffito preserved on one of Kormoran’s gunroom bulkheads, showing the names of its victims. Image: WA Museum and Curtin University. Copyright WA Museum.
In addition to the archaeological survey, the project’s primary aims were to preserve both sites virtually via 3D imaging and collect environmental data in an effort to develop strategies for their long term preservation. The latter initiative has also shed light on the deep-water marine ecosystems that exist on each wreck.
The manipulator arm on an ROV collects rusticle samples from Kormoran’s exterior hull. Image: WA Museum and Curtin University. Copyright WA Museum.
Both shipwrecks contain unexploded ordnance and potential environmental contaminants (such as fuel oil). For these reasons, and for the purpose of maintaining their archaeological and ecological integrity, sampling was restricted to a small number of areas outside each ship’s hull. Save for limited sampling of Sydney’s bow section to determine the extent to which it is corroding and deteriorating, the shipwrecks themselves were not disturbed, nor are there any plans to disturb either site for the foreseeable future.
Video of the 2015 expedition to survey the historic World War II shipwrecks of HMAS Sydney (II) and the German raider HSK Kormoran. Video: WA Museum and Curtin University. Copyright WA Museum.
References
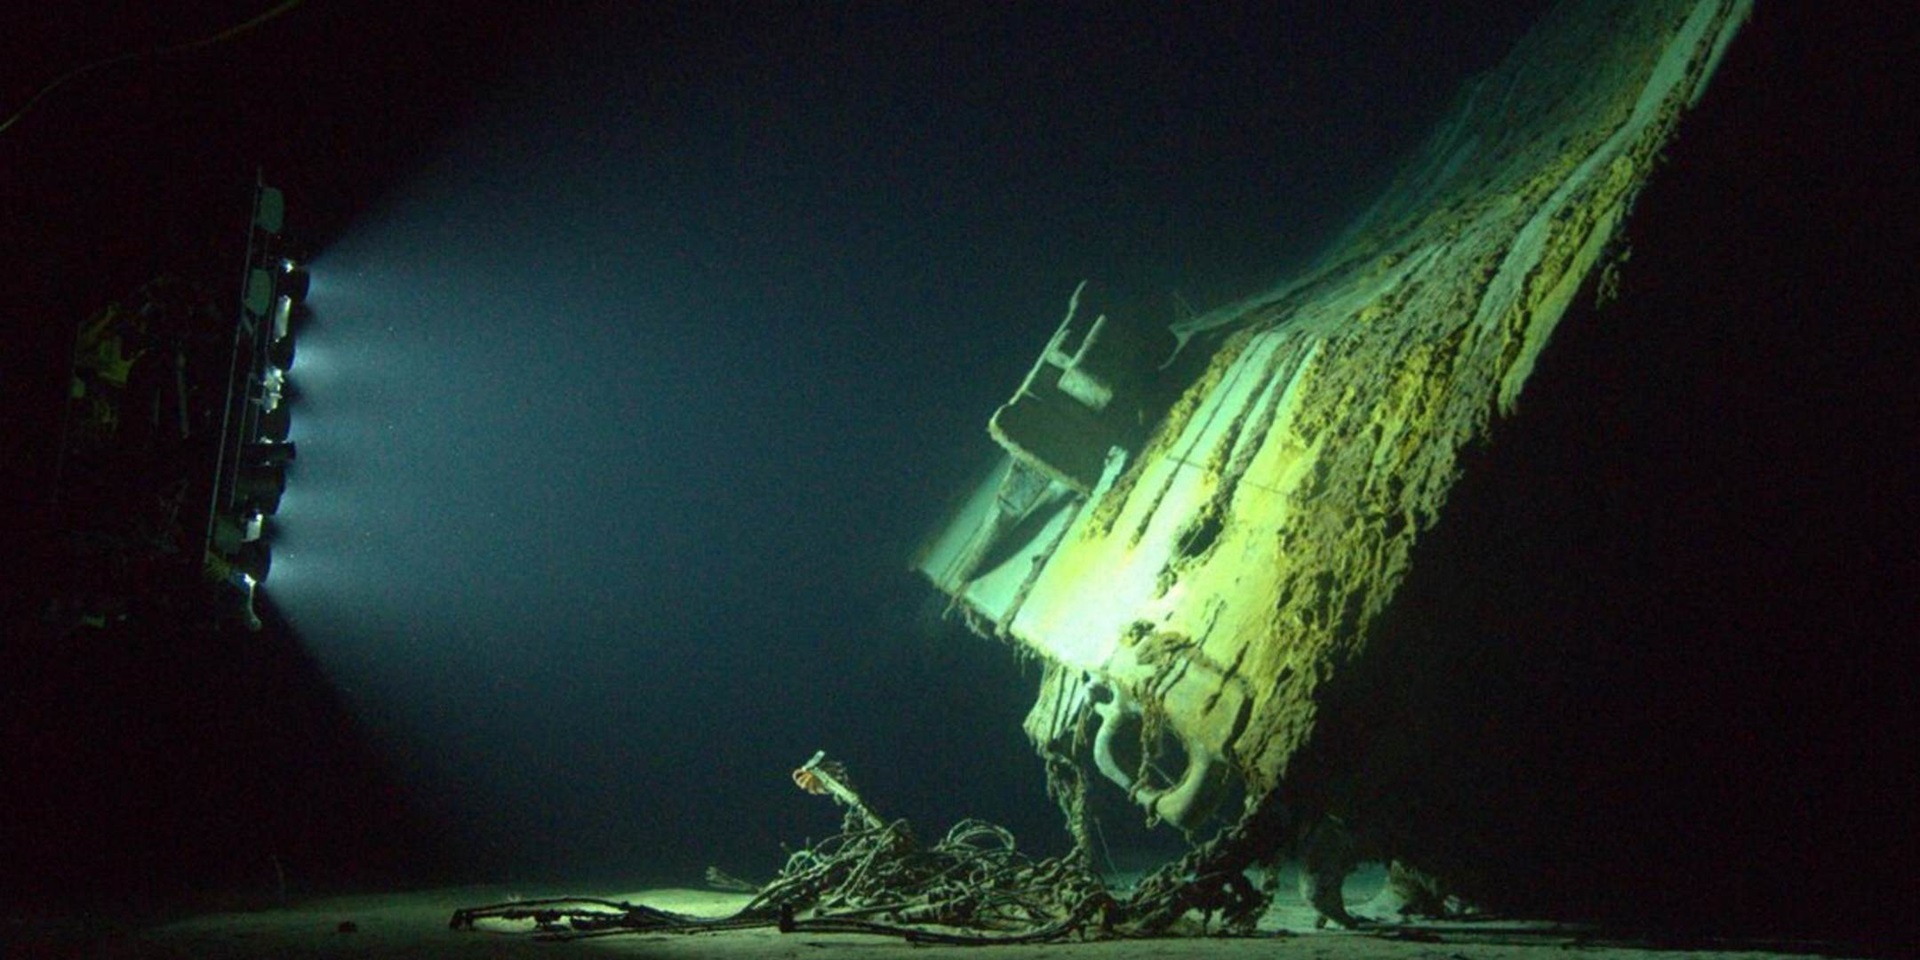
Cover image: Sydney’s inverted bow section is illuminated by an ROV during the 2015 survey. Image: WA Museum and Curtin University. Copyright WA Museum.
Credits
Bibliography
Frame, Tom, 1993: HMAS Sydney: Loss and Controversy. Sydney: Hodder & Stoughton.
Hore, Peter (ed.), 2001: HMAS Sydney II: The Cruiser and the Controversy in the Archives of the United Kingdom. Canberra: RAN Sea Power Centre/Defence Publishing Service.
Hore, Peter, 2009: Sydney, Cipher and Search: Solving the Last Great Naval Mystery of the Second World War. Suffolk: Seafarer Books.
McCarthy, Michael (ed.), 2010: HMAS Sydney (II). Welshpool: Western Australian Museum.
McCarthy, Michael (ed.), 2016: From Great Depths: The Wrecks of HMAS Sydney II and HSK Kormoran. Crawley: University of Western Australia Press.
McDonald, Glenys, 2005: Seeking the Sydney: A Quest for Truth. Crawley: University of Western Australia Press.
Mearns, David, 2009: The Search for the Sydney: How Australia’s Greatest Maritime Mystery Was Solved. Sydney: Harper Collins.
Olson, Wesley, 2000: Bitter Victory: The Death of HMAS Sydney. Nedlands: University of Western Australia Press.
Olson, Wes, 2016: H.M.A.S. Sydney (II) in Peace and War. Hilton (WA): Wesley John Olson.
Winter, Barbara, 1984: HMAS Sydney: Fact, Fantasy and Fraud. Brisbane: Boolarong Press.
Acknowledgements
I would like to extend a heartfelt ‘Thank You’ to author Wes Olson and WA Museum staff Tim Eastwood, Mack McCarthy and Ross Anderson for their expert review of my text, and to the WA Museum and Curtin University for graciously sharing still imagery and video from the 2015 Sydney–Kormoran expedition that is featured in this article.
Dr James Hunter is the inaugural Curator of RAN Maritime Archaeology at the Australian National Maritime Museum. He received his MA in historical archaeology from the University of West Florida, and holds a PhD in maritime archaeology from Flinders University, where he is an Associate Lecturer in the Department of Archaeology.
James has worked in the field of maritime archaeology for nearly two decades, and during that time has participated in the investigation of shipwrecks and other archaeological sites ranging from prehistory to the modern era. He was a member of the archaeological team that investigated the American Civil War submarine H.L. Hunley, and a staff archaeologist with the U.S. Naval History and Heritage Command’s Underwater Archaeology Branch. He has been published widely and is also an accomplished archaeological illustrator whose work has been featured in a number of scholarly books and articles.