Castaways
The art and craft of modelling and working up a work of art in bronze – the material of choice for public statuary for thousands of years – has changed very little over the millennia.
The lost wax casting technique requires highly skilled artists and artisans, even more so if the work is figurative. It is a fascinating process – in this case, the six-month sculpting process has seen the sculpture refined and modelled, cast in positive and negative forms several times in various materials to gradually take shape to embody the spirit of the concept. The sculpture is not cast in one piece, but in sections that are eventually joined together in a virtuoso display of welding, fettling and finishing.
Behind the scenes of making the Windjammers Sailors. Edited by Alex Parker.
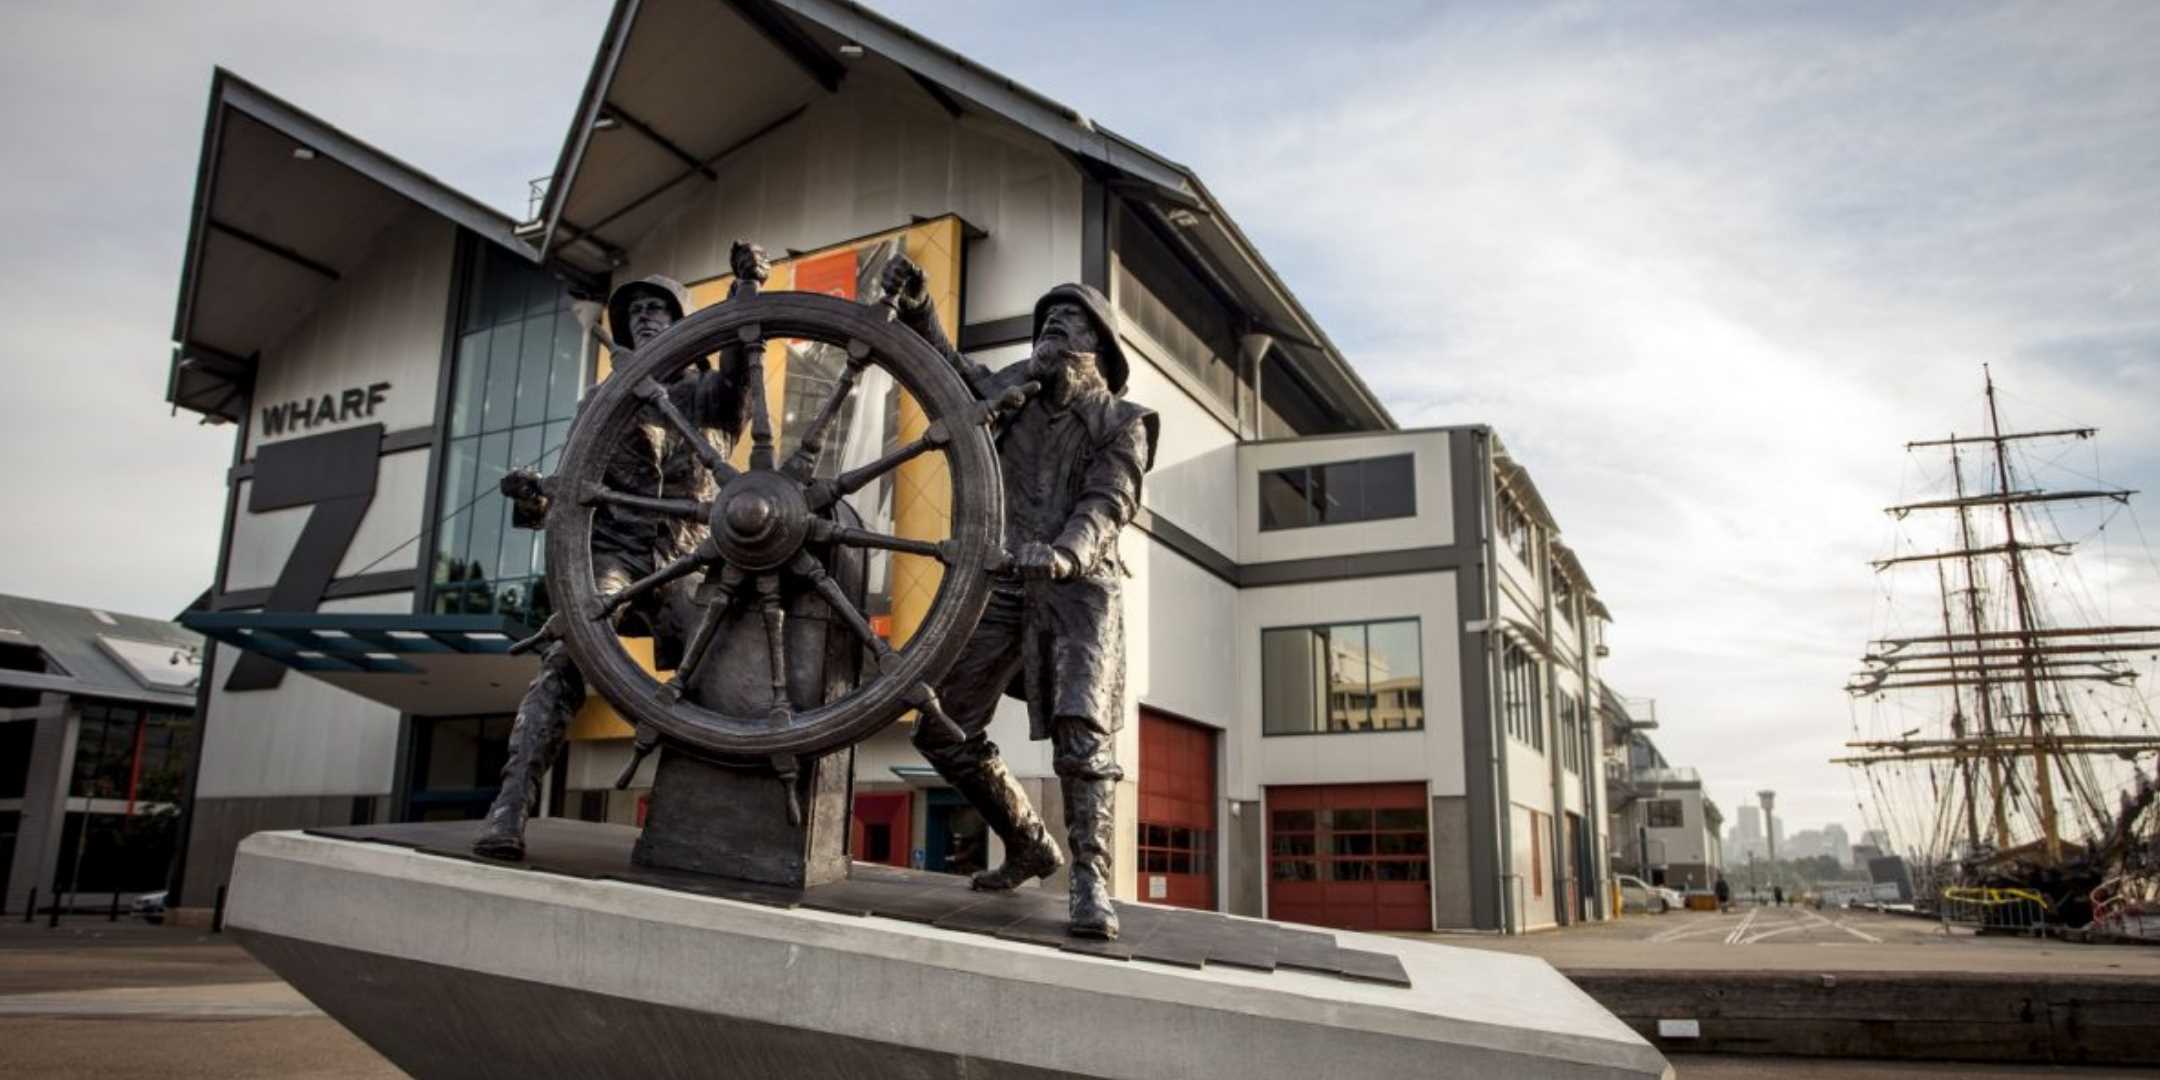
The brief was to enhance the ideas in the original concept – two men in a moment of danger wrestling with the wheel – and reinterpret them as a contemporary, expressionistic and energetic form so that the work looked as if it were created in the 21st century, rather than 500 years earlier, and so that it responded to its projected location on the wharf at the Australian National Maritime Museum, repopulating that wharf with some of the ghosts of its past, and adding people to the site in a traditional figurative form and technique but in a modern and contemporary frame. This first step involved modelling in miniature in plasticine to produce a maquette.

Concept by Dennis Adams mid-1980s. Courtesy Rear-Admiral Andrew Robertson.

Maquette made by Brett Garling 2015 to sculpt the clay. Image: Zoe McMahon / ANMM.
This process involved defining the key spatial relationships and poses – a very time-consuming exploration of form, fabric, wind and weather. The artists used real-life models, including in Brett Garling’s case himself, dressed in heavy wet weather clothing alongside a mock-up of a wheel. They experimented with various questions: how is the body positioned at the helm of a big sailing ship? Where are the hands and feet located in order to handle the wheel in heavy weather? What about the water? How might it work with the materiality of bronze?
So the artist experimented with positioning the sculpted figures in relation to the wheel, to each other and to the sloping plane on which they were to be located, representing the sloping deck of a ship. This mock-up modelling process gave a crude idea only, but was critical to assessing the overall form the work would take at full scale, life-size.
The maquette was produced. Interestingly, well after this process was completed an original bronze maquette made by Dennis Adams from his sketch was located in the collection of the Aland Maritime Museum in Finland. As this was not identified at the time, the artists had freedom to explore and experiment with from and aesthetic, resulting in a dynamic energetic figure group, interestingly minus the water rushing over the deck.

Bronze maquette made by Dennis Adams mid 1980s. Collection: Alands Sjofartsmuseum.
The overall work was then scaled up and sculpted in clay from the maquette. It was roughed out and then worked in fine detail. And each sculptor had a different way of doing this, either by eye or computer. In the case of Windjammer Sailors it involved both – the modelling was initially done by computer to determine the basic figure sizes and proportions and then by eye to model the figures in clay.
A coat of plaster roughing was first applied to the steel and polystyrene armature of the figures and the filigree wire of the clothing, which enabled the clay to stick. The clay needed to be kept wet, so the work was covered when not being worked on and sprayed with water to keep it malleable.


Artist Brett Garling modelling in clay. Images: Zoe McMahon / ANMM.
This is the creation of the work, the playful, crafted and tactile process where the artist works with clay to create the forms, poses, relationships, textures and surface finishes they are hoping for. This process, called the sculpt, took a large amount of time, scaling up and exploring ideas presented in the maquette.
Importantly, the artist had extensive experience and a deep understanding of the lost-wax bronze casting technique, and the flexibility a waste mould process such as the lost-wax technique gives the artist in creating the finish they desire. The high surface resolution it offers enables the artist to be experimental to pursue a highly textured and highly finished surface, in this case enabling Brett Garling to create a highly impressionistic surface treatment. In understanding how the bronze is finally represented, in harmony with the material
Clay to silicone mould – a negative form
It is at this stage that the foundry artisans, Matt Dunn and Phil Gordon, artists themselves, came into the frame. Their depth of experience and abilities would enable them to replicate the artist’s hand in bronze, in a highly skilled and calibrated process. They eventually produced a perfect bronze representation of the clay sculpt through stages involving differing materials and techniques, as the form of Windjammer Sailors somersaulted from moulds to casts and back again.
The critical next step was to cover the clay surface of the sculpt in layers of liquid silicone to make a silicone mould of the sculpt. The primary purpose of the silicone mould was to enable the subsequent stage to occur – the making of the wax casts.
The first layer of silicone, a casting silicone, captured the fine detail and texture of the clay surface – the artist’s hand. This critical first layer was very thin and runny and applied with great care by pouring or with a fine brush. The silicone was built up in layers, the outer layers being thicker until the mould is produced. The biggest risk to the process here is that the silicone is applied when the clay is still soft and damp and you could damage the form. Hence a degree of caution is used when applying the silicone layers.


Clive Calder at Australian bronze delicately applies the first coat of silicon to capture the surface of the sculpt. Images: Zoe McMahon / ANMM.
Early on a decision was made to use the wheel of the James Craig, an 1874 trading barque owned by Sydney Heritage Fleet and moored alongside Wharf 7, near the eventual site for the work, as the model for the helm. The silicone mould was made in situ at the wharves. This created a historic link between the windjammer sailors referenced in the sculpture, but more than that it created interesting tensions and some excitement in modelling the real timber artefact and the imagined artist’s work in clay. Such was the delicacy and exactitude of the silicone capture that the grain and details of the timber wheel are indeed evident in the bronze cast of the finished work.

The wheel was modelled from the real wheel of the James Craig. Images: Zoe McMahon and Daina Fletcher / ANMM
The foundry artisans then assessed the overall work to prepare for casting. It was not cast in one piece, but in segments – an arm, a head, a torso and so on.
Matt and Phil marked delineations and joints and sectioned the figures to enable the moulds to be removed, to determine the size of segments to be cast and the location of the splits or joins to enable the removal of those silicone/plaster moulds, which was intrinsic to this process.

Applying the keys, creating a Godzilla like look to the Windjammers. Images: Zoe McMahon / ANMM.
These joints were then lined with silicone rubber keys – ridges – and walls which enabled sections to be lifted out and dipped for subsequent casting. They gave each piece structure and defined the edge of sections to be removed. Because the silicone rubber mould is not firm, the sections were coated in acrylic plaster for rigidity and support. Importantly, these plaster jackets prevented the silicone from distorting, because if the silicone segments were to distort the work would be at risk of failure, the segments or sections unable to be put back together.

In pink to mark the penultimate silicon coat. Image: Zoe McMahon / ANMM.
The negative silicone mould was then removed in sections. The challenge was to demould very gently by locating the split in the plaster casing to remove it from the clay/polystyrene model underneath. The clay was now waste because the silicone mould – the negative form – had captured the texture.
This silicone mould was reassembled and taped up, still inside its casing or jacket. This ensures no distortion when the melted wax is poured into it.
Making the wax cast – a positive form
Casting wax was melted at high temperature, and the bubbles tapped out. It was then poured in layers inside the silicone mould very carefully to build up to about 6–7 millimetres in thickness. Care was taken with the temperature of the wax (hot on cold) and the cooling of layers between each pour. The biggest danger in this step is distortion, air bubbling and surface delamination when the top wax layer peels away, so to avoid this great care is taken with the comparative temperatures of the new wax layer and previous layers.

The wax casting of the wheel from the James Craig. Image: Zoe McMahon / ANMM.
The thickness of the wax would eventually be equal to the thickness of the bronze when cast in its final form.
The wax forms were then demoulded, removed from the silicone and plaster casing and cut where necessary to accord with the foundry’s facility and casting process. This was a delicate process because the wax is exacting and fragile. It will be the surface of the bronze. Here the foundry artists’ skill and experience proved critical.


Wax moulds are gently demoulded from the silicon and acrylic casing. Images: Zoe McMahon / ANMM.
Once demoulded, each piece was then checked carefully for accuracy – for trueness against the clay form. It is quite an exacting process to ensure that it did it in fact represent the artist’s hand.
The wax cast was the sculpture, a positive form in fragile wax, in pieces. So how does one now move from a positive wax form to bronze?

Matt Dunn with Chippy’s wax head with ingates and cups. Image: Zoe McMahon / ANMM.
The wax casts were fitted with a gate feeding or runner system of sprews, ingates and cups, into which the molten bronze would eventually be poured. Each piece would be cast in an appropriate position direction to maximise the ease of pouring, to enable the bronze to settle, so the feeding system was applied to each piece with care and judgement.
Making the ceramic mould – a negative form
It is the ceramic mould which will eventually be fired and filled with bronze. The job of the ceramic mould is to provide a heat-resistant jacket in which to capture the fine detail of the wax moulds for casting in bronze. Each wax piece was firstly dipped in two coats of very fine grain zircon, and a wet slurry solution of colloidial silica mixed with zircon flour as a sealing, binding and wetting agent.

Ceramic moulds of the wax casts of wheel. Image: Zoe McMahon / ANMM.
The slurry was kept in suspension to keep its viscosity. This very fine grain ceramic again captured the fine detail of the wax surface. Next came eight coats of coarser ceramic sand and a reinforcing mesh to strengthen the ceramic mould. The coats were built up to a shell 7– 10 millimetres thick.
The biggest risk to the process at this stage was building the correct thickness and strength uniformly, so that the mould will not fail, letting each layer dry adequately and by hanging or placing the pieces and having applied the gate feeding system correctly so that it won’t distort while drying.

Australian Bronze artists Matt Dunn and Phil Gordon firing the ceramic moulds after the wax has been gently burned out. Images: Zoe McMahon / ANMM and Matt Dunn / Australian Bronze.
Once dry the ceramic and wax pieces were placed base down, the cups sheared off and openings or holes drilled in the ceramic pieces to enable the wax to be released. With slow heating the wax was burned out and collected for later reuse.
The ceramic pieces were then placed in the oven and fired at a temperature of
900–1000 degrees for 1½ hours. The ceramic pieces were then ready for the bronze pour.
The bronze pour
This is the stage in the process when all previous stages are tested and proved. The work – the casting process – will either succeed or not.
In preparation for the bronze pour, the furnaces were preheated to 650 degrees and the ceramic pieces fired for one hour.

The bronze ingots are melted at a temperature of 1200 degrees. Image: Zoe McMahon / ANMM.
The bronze ingots are melted at a temperature of 1200 degrees in a crucible of silicone carbide which is able to withstand great heat. It becomes rubbery but doesn’t crack. Windjammer Sailors is made from silicone bronze, an alloy that comprises 95 percent copper, 1% manganese and 4% silicone, whereas ancient bronze was made of copper, tin and lead.


The crucible of molten bronze, and the pour into the ceramic moulds bedded in gravel, cups up. Images: Zoe McMahon / ANMM.
Known as the stainless steel of bronzes, silicone bronze was adopted by the marine industry due to its good casting characteristics, appealing surface finish and superior corrosion-resistant properties even when submerged in liquids and chemicals. It is known for its easy pouring ability. After casting it is very easy to work, weld, panel beat and bash into shape, with inherent flexibility and strength.

Out of ceramic, the bronze. Image: Matt Dunn / Australian Bronze.
The ceramic pieces were placed in the furnace, cups up, in gravel to secure them in preparation for the pour.
Once the molten bronze was poured the ceramic pieces were cooled rapidly with running water to allow for contraction as the bronze filled the cavity from the base and flowed towards the cup. The biggest risk here is that the ceramic moulds may catastrophically fail, or the surface of the sculpt now in bronze is not replicated. It could exhibit tearing or crazing. This could relate to the temperature or degassing of the bronze, and necessitated extreme caution and correct methodology at all steps in the process up to that point and then with the way the bronze was poured and cooled at that point.
Working the bronze – assembling and fettling
In this lost-wax process the ceramic shell is sacrificial, and was removed, as were the sprews or bronze ingates. This left the sculpted bronze forms, in pieces, some with open patches (left in the wax to allow the ceramic to penetrate) which were later recast and patched separately.

Phil Gordon joining, fitting and finishing the lower body. Image: Matt Dunn / Australian Bronze.
The bronze pieces were then ready for working, trial assemblage, reassemblage, welding and finishing and fettling. This is an incredibly skilled process that saw the pieces fitted together with unexpected and surprising degrees of force, ranging from panel beating the forms to align them to delicate manual adjustments, chiselling, abrading and then fine sanding and finishing. The pieces were welded together. The artisans replicated the texture of the piece, the artist’s hand, in camouflaging the joins, a highly skilled process of finishing the work and reinstating the surface of the bronze generally back to that of the original sculpt.

Australian Bronze artists Matt Dunn and Phil Gordon welding and trialling, fitting the main components November. Images: Zoe McMahon / ANMM and Matt Dunn / Australian bronze.
One of the challenges of this process was again testing the degree of distortion, to line up all the touch points and connecting points on the bronze work, the two figures, their four hands at the wheel, and their four feet planted either side of that wheel on the bronzed timber planks on the sloped surface which formed the base. Everything came together perfectly.

Finishing touches. Image: Zoe McMahon / ANMM.
The patina and wax – the finish
The application of the patina and the final wax coating finishes the piece. This provides the cosmetic and protective coat to prevent oxidation and limit discolouration of the bronze. Clive Calder applied a graphite patina with heat to achieve a dark finish and then a microcrystalline wax to the entire surface finish to improve the work’s longevity on the salty foreshore where it will now live.
For more information about the Windjammers Sailors and the museum, visit our website.