‘This cast a great gloom over us’
Somewhere off the coast of an island east of Papua New Guinea lies Australia’s greatest unsolved maritime mystery. On 14 September 1914, Royal Australian Navy submarine AE1 was on patrol near the Duke of York Islands. At 3.20 pm it reported nothing unusual to the accompanying destroyer HMAS Parramatta. The submarine headed off to continue patrolling and was never seen again. It disappeared without a trace.
In what was Australia’s first military action of World War I, between 11 and 12 September, Australian forces had fought and beaten German and Melanesian troops for possession of the German colonies in the region. The Australian naval forces were tasked with patrolling the area on 13 and 14 September.

Photograph of submarine AE1, c. 1914. Photograph by Allan C Green. Courtesy State Library of Victoria, H91.250/1435
Just east of Duke of York Island visibility was reported at five nautical miles in an afternoon haze, which was common to the area. There were no credible reports of German forces and the weather was calm. AE1 had had some mechanical issues, but was still able to head out on patrol.
There were strong currents and potential unknown navigational hazards, but nothing unusual was noted by the numerous Australian forces in the area.
At 8.15 pm Commander Stoker on submarine AE2 reported to the flagship HMAS Australia that AE1 had failed to return to harbour. In a period of just a few hours AE1 had vanished. There was no debris, no oil slick, no distress message; nothing.
Despite searching by the Australian naval forces for several days afterwards, and many investigations in the years after, there is no conclusive evidence as to the fate of AE1 and the 35 officers and crew. Many theories have arisen over the years.
Wireless radio operator John Brown who served on what he described as the ‘old tank’ HMAS Protector in early 1914 was one of many at the time who had a theory about the submarine’s disappearance. Brown thought that engine trouble was the cause. But he rather wistfully noted in his diary that ultimately, because of the deep waters where the vessel disappeared, ‘nobody will ever know how those lads died…’
John Harrison Wheat on board AE1’s sister submarine AE2, recalled how when AE1 did not return and searches by the naval forces did not ‘reveal the slightest trace of anything… [that] this cast a great gloom over us.’
Why was AE1 in New Guinea?
In the 1880s Germany—which had already been trading in the area—claimed the north-eastern part of New Guinea as a protectorate and in 1884 established German New Guinea. By 1885 Germany and Britain (with a little help from the Colony of Queensland) had divided eastern New Guinea between them.
By 1914 the ‘Imperial German Pacific Protectorates’ had expanded beyond the eastern New Guinea mainland to include the Solomon and Marshall Islands and Nauru. In the central Pacific the Germans had also colonised part of Samoa establishing a broad reaching, if somewhat overstretched series of island colonies that gave some credence to German claims of having a vast empire to rival the British.

Map of the world showing colonial possessions and commercial highways, 1910. From The Cambridge Modern History Atlas, 1912. The University of Texas at Austin
As early as 1911 Australia and New Zealand were commencing strategic military and political planning in the event of war with Germany—plans that were also concerned with limiting Japanese expansion in the Pacific. This planning totally ignored home defence and focused on a swift seizure of German Samoa by the New Zealanders and German New Guinea by the Australians.

Embarkation of the Australian Naval and Military Expeditionary Force (AN&MEF) for New Guinea, 19 August 1914. Australian War Memorial Collection, A03272
In fact, Australia and New Zealand had pretty much divided up the Pacific Ocean between them, drawing a line down the middle and each taking control of separate parts of the German colonies. Australia had already colonised Torres Strait, then part of eastern New Guinea, and now, after Federation, there was a growing feeling of responsibility for upholding British interests in the Pacific—what has been described as a form of ‘sub-Imperialism’.
In August 1914 when war broke out in Europe, planning became reality and an Australian Naval and Military Expeditionary Force (AN&MEF) was quickly created. One thousand men enlisted in Sydney and made up the 1st Battalion. Another 500 naval reservists and ex-sailors were recruited. Unlike the Infantry battalion of recruits, many with limited experience, most of the naval brigade had prior military training and experience.
But the conquest of German colonies by the AN&MEF was by no means straight forward. Although the Australian force was superior to the Germans and their Melanesian ‘police-militia’, the AN&MEF met unexpected resistance at the Battle of Bita Paka.
Still, the Australians had assembled the most powerful naval force in the region and from the first troop landings on 11 September 1914, it only took a matter of days to establish control over much of the German protectorate. While the Japanese took control of Micronesia, Australian forces completed the conquest of the remaining German areas with the occupation of Nauru by 6 November.

A contingent of the Australian Naval Expeditionary Force to New Guinea being inspected by a Japanese Admiral at Rabaul wharf in 1914. Australian National Maritime Museum Collection, 0004152
While Japan was an ally of Great Britain and hence Australia, and supported operations in the Pacific and was part of the naval escort for the First AIF convoy from Albany in November, this alliance was always an uneasy one. Japan, like Australia, had imperial ambitions in the Pacific that would have significant ramifications in the future.
As the whereabouts of the German East Asia Squadron—which included the heavy cruisers Scharnhorst and Gneisenau and the light cruiser Emden—were at this stage unknown, almost the entire RAN fleet was sent in support of the venture. HMAS Australia—the heavy cruiser that was even on her own feared by the Germans—supported the New Zealand conquest of German Samoa and then returned to rendezvous with the AN&MEF off New Guinea. The submarines AE1 and AE2 and their support vessels joined the flotilla and it made for the centre of German colonies in the area—and the site of radio communications facilities—Rabaul on the eastern tip of New Britain.

Charles Bryant, Australian squadron in Blanche Bay, New Britain, 1924. Courtesy Australian War Memorial, ART07546
After the Battle of Bita Paka, the main German heavy ships still remained unlocated. Rabaul had seemed a likely place for the Germans to concentrate, but fears of the superiority of HMAS Australia had led the armoured cruisers Scharnhorst and Gneisenau to head east towards South America.
But this was not known and while the occupation of Rabaul went on, the submarines were paired with a destroyer each and sent out on patrols. On 13 September AE2 went out with HMAS Yarra. With orders to return by nightfall, Yarra could not follow up on the sighting of an unidentified ‘steamer’ south of Duke of York Island.
AE1 vanishes
On Monday 14 September AE1 was directed to patrol with HMAS Parramatta (interestingly, Australia’s first commissioned modern warship still lies visible in the mangroves of the Hawkesbury River north of Sydney where some of its hull was used as accommodation during the Great Depression).
AE1 had a fault with the ‘starboard shaft’—it had several failings of the starboard engine clutch during the maiden voyage from the UK to Australia. What this meant was that AE1 could not go astern on the surface, and the starboard engine was completely unavailable when diving.

The last known photograph of AE1, 9 September 1914. HMAS Yarra and HMAS Australia appear in the background. Courtesy Sea Power Centre - Australia
After parting company with Parramatta at the start of the day, the two vessels were reunited at 2.30 pm in the afternoon two miles to the east of Duke of York Island. With visibility at five nautical miles in an afternoon haze, Parramatta moved off. By 3.20 pm it had lost sight of AE1, assuming it had headed back to Rabaul as they were under orders to return by nightfall.
At 8.15 pm Lieutenant Stoker on AE2—who was awaiting AE1 with arrangements to make the repairs it needed—reported to the flagship HMAS Australia that AE1 had failed to return to harbour.
A search was ordered and that night Parramatta and Yarra swept around the Duke of York Islands with searchlights and flares. No trace was found. An oil slick was discounted as being from a passing ship.
In a period of just a few hours AE1 had vanished without a trace.
The search begins
Over the next two days, a collection of ship’s boats, steam pinnaces and small captured German vessels scouted the coastline around the Duke of York Islands and along the northern coastline of New Britain Island. Some of the Melanesian locals were questioned and they said they saw the submarine during the day on the 14th, but apparently had no further information.
Submarines were a novelty to the people of New Guinea and New Britain. When AE2 first visited the area, Commander Stoker reported how the islanders, astounded at how submarines could dive underwater, called them ‘Devil Fish’. He noted that some villagers ran into the hills at first sight of them surfacing.

View of Rabaul from the harbour, New Guinea, approximately 1914. Courtesy National Library of Australia, nla.pic-vn6453261
The Tolai people on the Duke of York Islands must have watched with interest and amazement at this large Australian battle fleet and its submarines. They did report seeing AE1, but knew nothing of its demise. Unfortunately, the search party in September 1914 did not question the Mioko Islanders.
On Mioko Island there were stories handed down over generations about events between 11 and 14 September. One story describes a ‘monster’ that approached the reef off Mioko Island, stopped and then moved off to the north-east.
In the 1970s the Mioko Islanders told Commander John Foster of the Royal Australian Navy that they saw the ‘devil fish’ approach Mioko Island from the north-east on the surface. The submarine then stopped, went backwards, then it disappeared. They described how their ancestors observed this event from some sea caves on the eastern end of Mioko Island, close to Wirian Village and very close to Wirian Reef.
‘Sunk by enemy’

Photograph of submarine AE1 preparing to be towed, 1914. Australian National Maritime Museum Collection, 00015811
Another theory has been proposed. That, as Lieutenant Stoker gave as another possible cause for AE1’s loss in his report to Admiral Patey, AE1 was ‘Sunk by enemy.’ In fact, the Commanding Officer of HMAS Encounter was convinced of it. During coastal search operations, on 19 September, Encounter found a German schooner the Kolonial Gesellschaft (or the Kolonia) abandoned, on fire and hard on a reef off Cape Pomas on the far north western tip of New Britain Island.
A shore party from HMAS Warrego boarded the vessel and found evidence of a Maxim machine gun mounting and spent one pounder shell casings on the main deck. An old five barrel Nordenfeldt rapid firing gun was also found in the hold.
A captured German sailor told Australians—apparently without any prompting—that he had sunk a submarine with the Kolonia. He recounted how he saw the submarine ‘hove to’, and he then ran up the white ensign on the Kolonia, approached AE1, fired a shot into her and then rammed her.
However there are no other corroborating details to this story. There are numerous factual errors and confused dates. An alternative explanation is that when the captured sailor was in Rabaul hospital recovering from typhoid he picked up the elements of this story, and the rest could have been his imagination.
Both the official war historian A W Jose and AE1 expert Commander John Foster found, from the evidence of the Kolonia’s log, that it was highly unlikely this vessel had been in a position to attack AE1. Whilst a 25 millimetre gun could indeed damage the submarine, it would require a lot of ammunition to be able to completely destroy the submarine on the surface in this manner. And while this may eventually cause the boat to sink, it would have taken some time and there would have been a deal of oil, smoke, noise and debris.

HMA Ships AE1 & AE2 General Arrangement Drawing (Stbd. Elevation & Sections). Courtesy Royal Australian Navy
AE1 researchers have suggested there is one possible scenario which involves enemy action against AE1. The E Class submarines had at that point no defensive armament to fend off a close-in attack by another vessel. They had no deck guns or machine guns, just the officer’s sidearm’s, some rifles and probably some cutlasses. (HMAS Yarra had apparently sent some men ashore during the fight for Bita Paka a few days earlier, armed only with cutlasses).
If a German vessel armed with a rapid firing gun had come out from Mioko or Kerewara Harbour and attacked AE1, their only options would have been to outrun it, dive to avoid it and/or return a torpedo attack. To have dived in close proximity to the fringing reefs could have led to being caught on the reefs, holed and sunk without a trace.
It is possible to construct a credible scenario that AE1 was hit by shellfire, initiated a ‘crash dive’, was rammed whilst in the process of diving and without propulsion, leading to a loss of control’ and either hit the bottom at speed if in shallow water or exceeded their crush depth in deep water further offshore. But it is not a widely favoured theory among serious AE1 researchers.

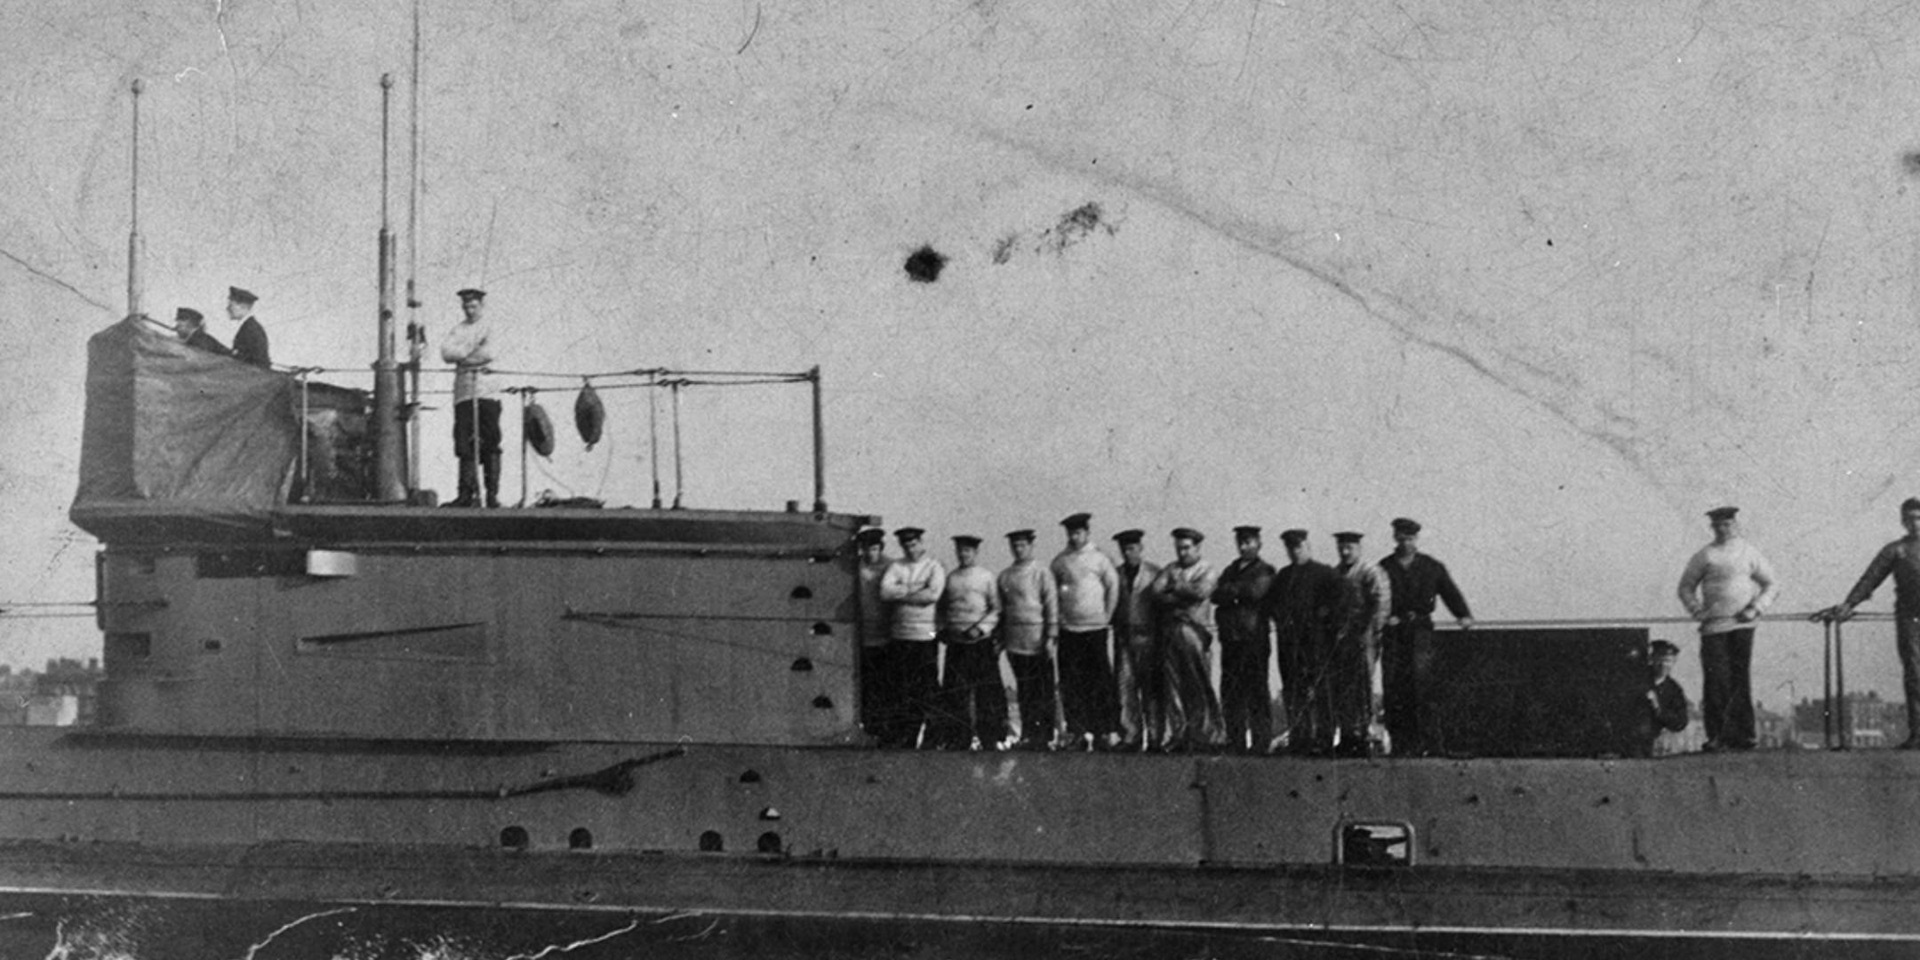
Submarine AE1 and crew, c. 1914. Courtesy Sea Power Centre – Australia
Radio Wireless Operator on HMAS Protector, John Brown, recorded his version of events in his diary. He noted that ‘The news [of AE1’s loss] was received with great sorrow throughout the fleet’ and that ‘it is thought that she exploded while she was submerged.’
Brown—unlike any other records of the event—mentions a communication between Parramatta and AE1. Brown recorded that:
AE1 made to Parramatta, “I am going to submerge a little, can you see me[?].” Parramatta replied “Yes, carry on.” A.E.1 submerged until only her conning tower was visible, she then made to Parramatta, “Everything is all right, I am going to dive”.A.E.1. dived & was never seen again.
Brown’s version sounds a little third-hand; he says that AE2 was also out patrolling (which it was not) and that while submerged AE2 had heard an explosion, but noone else apart from Brown reported this.
Brown’s account is inconsistent with other reports in many ways. However he may well have been astute about one thing: ‘nobody will ever know how those lads died’.