Over the last couple of weekends, I have managed to make a full sized, NSW south coast, tied-bark canoe. They are known as nawi by the Indigenous communities based around Sydney Harbour. Although probably wider than an original one would have been and some details still not accurate, my canoe has recreated the style and produced a method that forms the folds. The finished craft does look like the craft seen in images made by early explorers.
When I started researching Indigenous watercraft, building a bark canoe had been an objective which I thought might take some time to actually happen, largely because of the difficulty in obtaining a piece of bark. In the end I got past that issue in a novel way.
James Dodd, a teacher with NSW state education had built some bark canoes from 2008 to 2010. When he left to go overseas in 2011, he gave me three of his craft as he had nowhere to store them. One has since gone to a good home with the community at Vincentia High School, Jervis Bay, and another will go on to Bateman’s Bay in 2012, where it too belongs. Both were nawi types, but the third one was only partially formed, in the shape of a TEN CANOES style craft from Arnhem Land. I stored this away thinking I could finish it off, but around late August I hatched a grander plan. Instead of soaking it to take out the twist and then finish it off, I thought I would try to flatten it out and start again, but this time on a nawi!

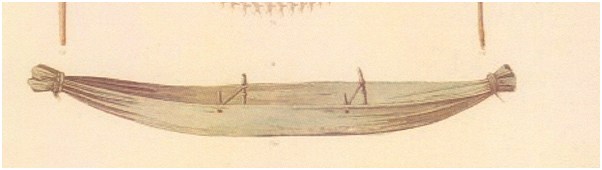
A canoe from Jervis Bay , artist Louis Auguste de Sainson, November 1826. He was sailing on the French ship Astrolabe with Captain Jules Dumont d'Urville.
The shape of the craft is based on the style illustrated by Louis Auguste de Sainson who sailed on the French ship Astrolabe with Captain Jules Dumont d’Urville. They visited Jervis Bay in November 1826 and a canoe was sketched very accurately (pictured).
There was also another fine example in a water colour by Oswald Brierly done in the late 1840s, showing a canoe in Twofold Bay. In addition there were some consistent features noted in the few descriptions of canoe making that I have found so far, so I combined the common details of these resources:
- The bark would be turned inside out
- The ends thinned down
- The bark would be made more supple by soaking it with water and using heat when the time came to form the ends
- The folds in the ends would be secured by bark strips and pegs
- And it would have just two frames, secured to the top edge of the canoe and fitted with bark cross ties.
So let’s start: First by wetting it down and putting some bricks on the edges, I gradually let it flatten out over two weeks. I then turned it over, with help (its heavy material), so the outside of the bark became the inside of the canoe.
DAY ONE: Over an hour on 27 August, I peeled back the layers of the loose exterior bark (now on the inside of the canoe panel) and thinned down over 1 metre of bark at the ends. The long strips were put to one side to use later on as ties.
At this point it was necessary to soak the bark for some days. This was done by hosing it down morning and night, and leaving it covered in wet towels to hold in the moisture. The rain helped too at one point, and it was in the shade from 10.00am onwards each day.
DAY TWO: Sunday 18 September, that warm summery weekend we had in Sydney not so long ago. Off came the towels and I could feel that the bark was quite damp. I planned to fold and secure the ends of the nawi. Clamps, ropes and bricks were brought down, cats told to keep clear, and then it was time to put the kettle on. Not for a cuppa though – instead of lighting a fire, which is just not possible in the suburbs these days – I was going to pour boiling water onto the ends to get the required heat to help make it more supple.
Kettle boiled, water tipped out onto an end, it’s time to do the folds, no more procrastinating. I have no knowledge of how it was done, but I did find a way of doing it earlier on, when I made my model. On the model, I had first tried working from the middle to make the folds, but it just would not work. What I found worked was to go from the outside in. So I created two folds on each side then pulled both sets of folds together to form another fold in the middle. But this time, on the big boat, I used clamps to hold the sides as I folded them in, and then another clamp for both sets of folds pulled together. I tied it all off with rope, and took off the clamps – one end done!
No time to stop, kettle back on, inquisitive cat moved to one side, kettle boiled, hot water poured on the other end, more clamps, ropes – end number two done. And its only 10.00am.
The worst part was over. Would it fold or just crack into long sections? These had been my big concerns, but thankfully it had all folded and the only cracks were the small ones already there in the ends before I started. The other good news, the ends had pulled up away from the bottom, and the sides had begun to come in, and it was clearly forming a boat shape – this was going to work!
Next step was to push pegs through and help secure the ends of the nawi. So I cut some small bits of casurina and carved an end into a point, which would be the peg. I created a hole in the bark with a screw driver, and hammered the peg through the hole the blade had started to create.
Confident I could now finish it with the frames, I set to searching out some small diameter flexible branches or saplings that would bend to form the frames. Two casurina branches and a gum tree branch were found, trimmed of twigs and other bits, then thinned a little where they had to bend the most. Another thing I had learnt from the model; it’s easier to pull the branches into the shape I want and tie them off pre-curved, and then fasten them into the hull by pulling the bark onto the frame.
So, tying them off with some synthetic rope, I placed them in the hull where I wanted them, and then set about securing them to the top edge with bark strips. On the first two ties I pushed holes in either side of the branch and fed the ends of the bark strips through, with difficulty. It formed a loop on the inside holding the frame and bark close together while on the outside I went up the topsides and around the branch, finishing each end off with a double hitch, which may or may not be right! The difficulty with the holes made me try a slot on the next two, and this was much easier to manipulate to get the bark through. Lunch time-and other things to do for a while, before I went back to it.
First job was to make some rope from the bark to replace the synthetic rope holding the branch and topsides in shape. Sitting in the sun, two long and wide strips were chosen, and twenty minutes later the twist method had produced over a metre of rope. This was then hitched to each side of a branch and pulled up tight. Enough for one day, it was clear my objective of a bark canoe was going to be realised, so I tided up, put some bricks under the ends to help hold them up, and left it to start drying out for the week.
DAY THREE: The following Sunday 25 October was wet. Wet, cold and windy. But not wet enough to stop me working. Another section of bark rope was made and four strips chosen to secure the ends, two per end.
Out into the drizzle, I took off the synthetic rope from the ends and replaced it with bark strips lashed and hitched around the ends over the folds, with the end of the bark strip hitched around the peg. This came up nice and tight, and there was no tendency for the folds to want to unfold either.
Last job, put the other bark rope cross tie on, and take off the synthetic rope, easy, take some pictures, put things away, and all done inside an hour! At which point it began to rain, and rain hard, so the rest of the day was spent bailing it out every two hours, and all the drying out from the week before was gone. But at least if the water would not go out, then surely that means it won’t come in?
This we will find out soon.
David Payne, Curator Australian Register of Historic Vessels.
Australian National Maritme Museum