‘A big, wounded fish’
After spending the next night submerged, then scaring off several more transports the next day, Stoker saw an opportunity and fired a torpedo at a transport vessel. Its escorting destroyers then attempted to ram AE2 and as the submarine dived, a destroyer’s propellers sounded so close that ‘we ducked our heads to allow it to pass’.
Another night was spent lying on the bottom. Kinder reflected that:
When the boat is lying on the bottom with only a pilot light on, one begins to imagine all sorts of things happening… Perhaps it would not be able to rise again with the crew caught like rats in a trap with no hope of escape. If you let your imagination run too long you can feel your hair rising … Sometimes the sound of a voice is a welcome sound.
Then on 29 April, in a moment of utter surprise and almost disbelief, a British submarine was spotted. E14 had also run the gauntlet in AE2’s wake. The two commanders then agreed to separate and rendezvous the next day.
But this meeting was not to occur. The next day, on nearing the appointed rendezvous, two Turkish gunboats and a destroyer were sighted making a bee-line for AE2. When the vessel dived, something was wrong – the boat started to go down by the bow. It was impossible to stand; ‘everything moveable in the boat started to slide and roll to the bows’.

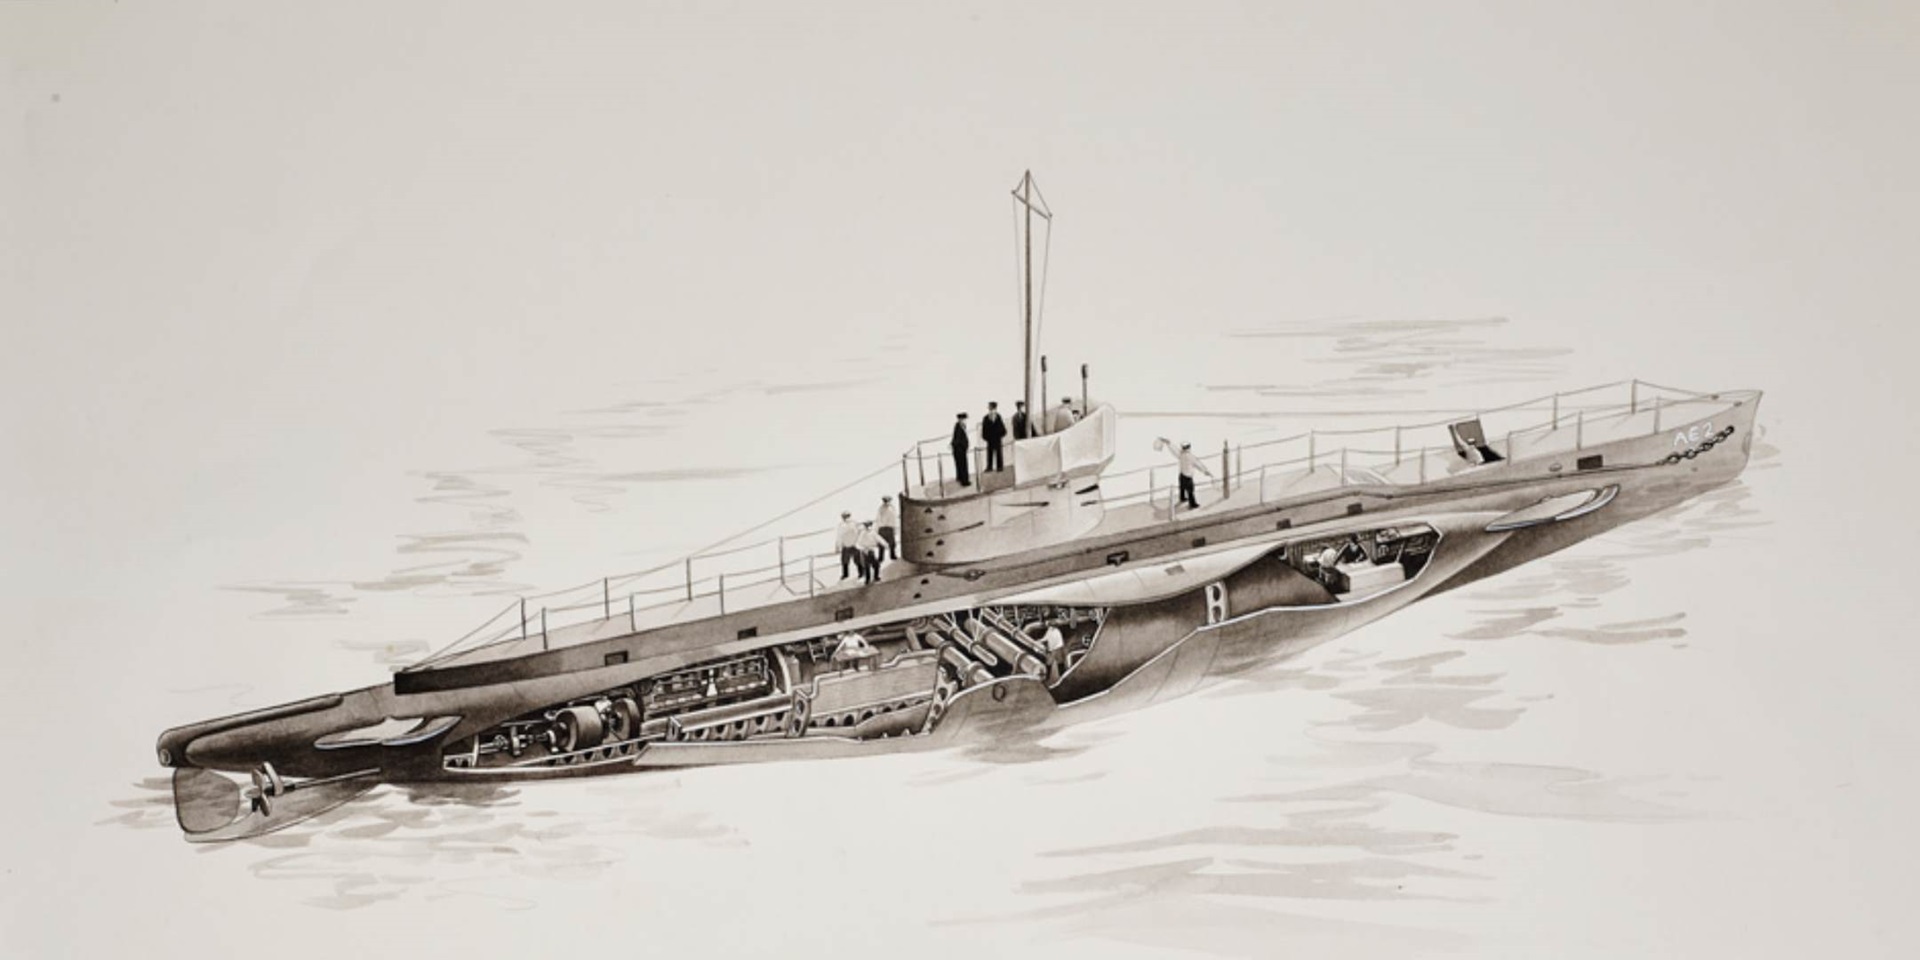
This contemporary cutaway illustration of HMA submarine AE2 details upper and interior sections including the control tower, engine room, wardroom and steering position. Tiffanie Brown. Australian National Maritime Museum Collection
Eventually, after all the ballast tanks were blown and with the engines full astern, AE2 began to rise. But circling above were Turkish warships. AE2 surfaced with a ‘whoosh’ and Stoker quickly flooded the tanks in order to dive again, hoping this time to dive correctly. But luck had seemed to finally desert AE2.
Just as it was about to submerge, three shells hit the vessel. Water was flooding the engine room. AE2 descended and after a hard struggle, the watertight doors to the engine room were closed. The vessel went down to 80 feet and then stopped. Would the flooded engines keep going? Without them AE2 could not surface.
Many things flashed through my mind in those few minutes. I could picture AE1 and her crew under similar conditions fighting for their lives with all the boat in disorder. Although they couldn’t have lived long … and the boat’s hull would soon have been crushed under the enormous pressure … Still, they must have suffered agonies in those few seconds. We would be lucky if we did not share the same fate.
Then AE2 began to rise. Perhaps luck was still with them. But on the surface the crew soon realised AE2’s end had come. While Stoker gave the order to abandon ship, the two gunboats were still firing and shells were falling all around.
Henry Kinder spent his last few minutes looking around the boat. He noticed the clock at five minutes to 12, and recalled there was a rabbit pie in the oven. He left the pie and went to his ditty box to retrieve 16 shillings and a photograph of his wife.
On deck, Kinder saw Commander Stoker come up after opening the kingston valves to scuttle the vessel. They then dived overboard with the rest of the crew. For a few seconds Kinder saw AE2 ‘moving through the water like a big, wounded fish, gradually disappearing from sight’.
There was only one casualty – a large rat that the cat at Garden Island in Sydney had chased on board one morning when the submarine was lying alongside. The rat took up residence in the engine room and the crew fed him to stop him eating their own food.
In what Commander Stoker agreed was a surreal moment, Kinder noticed that Lieutenant Haggard had lit a cigar just before leaving the boat and he recalled that Haggard looked rather comical floating around amid clouds of smoke. Stoker remembered a different moment:
Curious incidents impress one at such times. As those last six men took [to] the water the neat dive of one of the engine-room ratings will remain pictured in my mind forever.

The Turkish torpedo boat Sultanhisar, 1915. Australian War Memorial, A01409
The Turkish torpedo boat Sultanhisar under Captain Riza took the crew prisoner. They remained in captivity for the rest of the war. Riza later wrote his own version of events in his book How I sank the AE2.
Henry Kinder recounted much of his time in the camps in his memoir, but said ‘there were many incidents that happened during the time that we were prisoners that I will not be able to write down here’.
He apparently never spoke about these events after the war. Kinder returned to Australia a broken man, having suffered kidney damage, malaria and severe beatings in the camps. He left the RAN in 1919 and moved with his wife to Dorrigo and then Casino in northern New South Wales. In later life he moved to Evans Head where he apparently became increasingly eccentric and entertained the locals by making large beach-sand drawings and sculptures. His artistic nature was still with him. Henry Kinder died on 25 April 1964 – Anzac Day.

A page from a Turkish newspaper from 1915. In Turkish, the story relates the capturing of the crew of the AE2 by the torpedo boat Sultanhisar in the Sea of Marmara. Australian National Maritime Museum Collection
Lieutenant Geoffrey Haggard kept a ‘black book of notes’ after the war, though he never published them. According to his daughter, Haggard remained deeply troubled by the events of 1915. AE2 sent a wireless signal through to say the vessel had breached the Dardanelles Strait, and it has been argued that this news had a role in firming the Allied commanders’ resolve to continue the Gallipoli invasion, rather than evacuate in the early stages. The resulting carnage haunted Haggard for the rest of his life, resulting in a long personal silence for this crew member of submarine AE2, the so-called ‘Silent Anzac’.

Handwritten envelope addressed to Lieutenant Geoffrey Haggard whilst he was imprisoned in Turkey after his capture in April 1915 in the Sea of Marmara. Australian National Maritime Museum Collection, Gift from Jennifer Smyth