
Finished craft: A sensory jungle. Image: Annalice Creighton / ANMM.
Feathers, fur or fins,
shell or skin or scale,
if it walks on legs or flys on wings,
if it runs or crawls or slithers or swims…
I’m not sure if the timeless lyricism of Don Spencer echoes in anyone else’s mind when they behold the stunning selection of images that make up this year’s Wildlife Photographer of the Year but they sure do for me (possibly just a side effect of life in the kids programs lane – there is a catchy tune for almost everything!) Mischievous lizards catching tiny birds on the tip of their tongues, frenzied swarms of cuttlefish, grinning foxes, a veritable feast of tones, textures, unbelievable moments so magical and yet so vivid you feel like you could reach out and touch them.
Inspired by the Wildlife Photographer exhibition, this month’s craft spot is devoted to wilderness themed sensory play resources, it’s a craft activity that is not necessarily done with kids but crafted for very young children.
If you’ve spent any period of time around early learning circles the term sensory play is not at all new, the idea that engaging the senses encourages scientific processes, stimulates brain development, engages important neural pathways for future learning, develops creative thinking and problem solving, facilitates self-regulation and a host of other essential life skills, well this, you already know.
For our Sea-side strollers program we’ve been crafting some new kinds of pop up play spaces in the galleries, part theatre for the very young, part art installation, places all dressed up in shiny fabrics, musical instruments, tactile sculptures, pulsing lights, bubbles machines and wordless stories you can touch and play with.
Here’s a few of the how-to’s for some components of what we have been making: A guide to making a sensory forest.
Texture Panels


You will need:
- Embroidery Hoops or picture frames
- Range of scratchy, slimy, smooth, silky, fuzzy textures – we used shibori wrapped fabric, fabric with stones or beads wrapped in it, place mats with grip tape stripes, door mat, silicon bath mat, faux plants with furry leaves and a squishy lava lamp style panel made of baby oil, food dye, metallic cellophane and gaff tape in a ziplock bag. Other great textures are faux fur, leather, bobbly textured bath mats, scrubbing brushes, sponges or mop heads, silicon pot holders, rope…the list goes on.
- Some elastic
- Scissors
- Craft knife
- Heavy darning needle and upholstery thread
- Clear liquid nails
- Cable ties
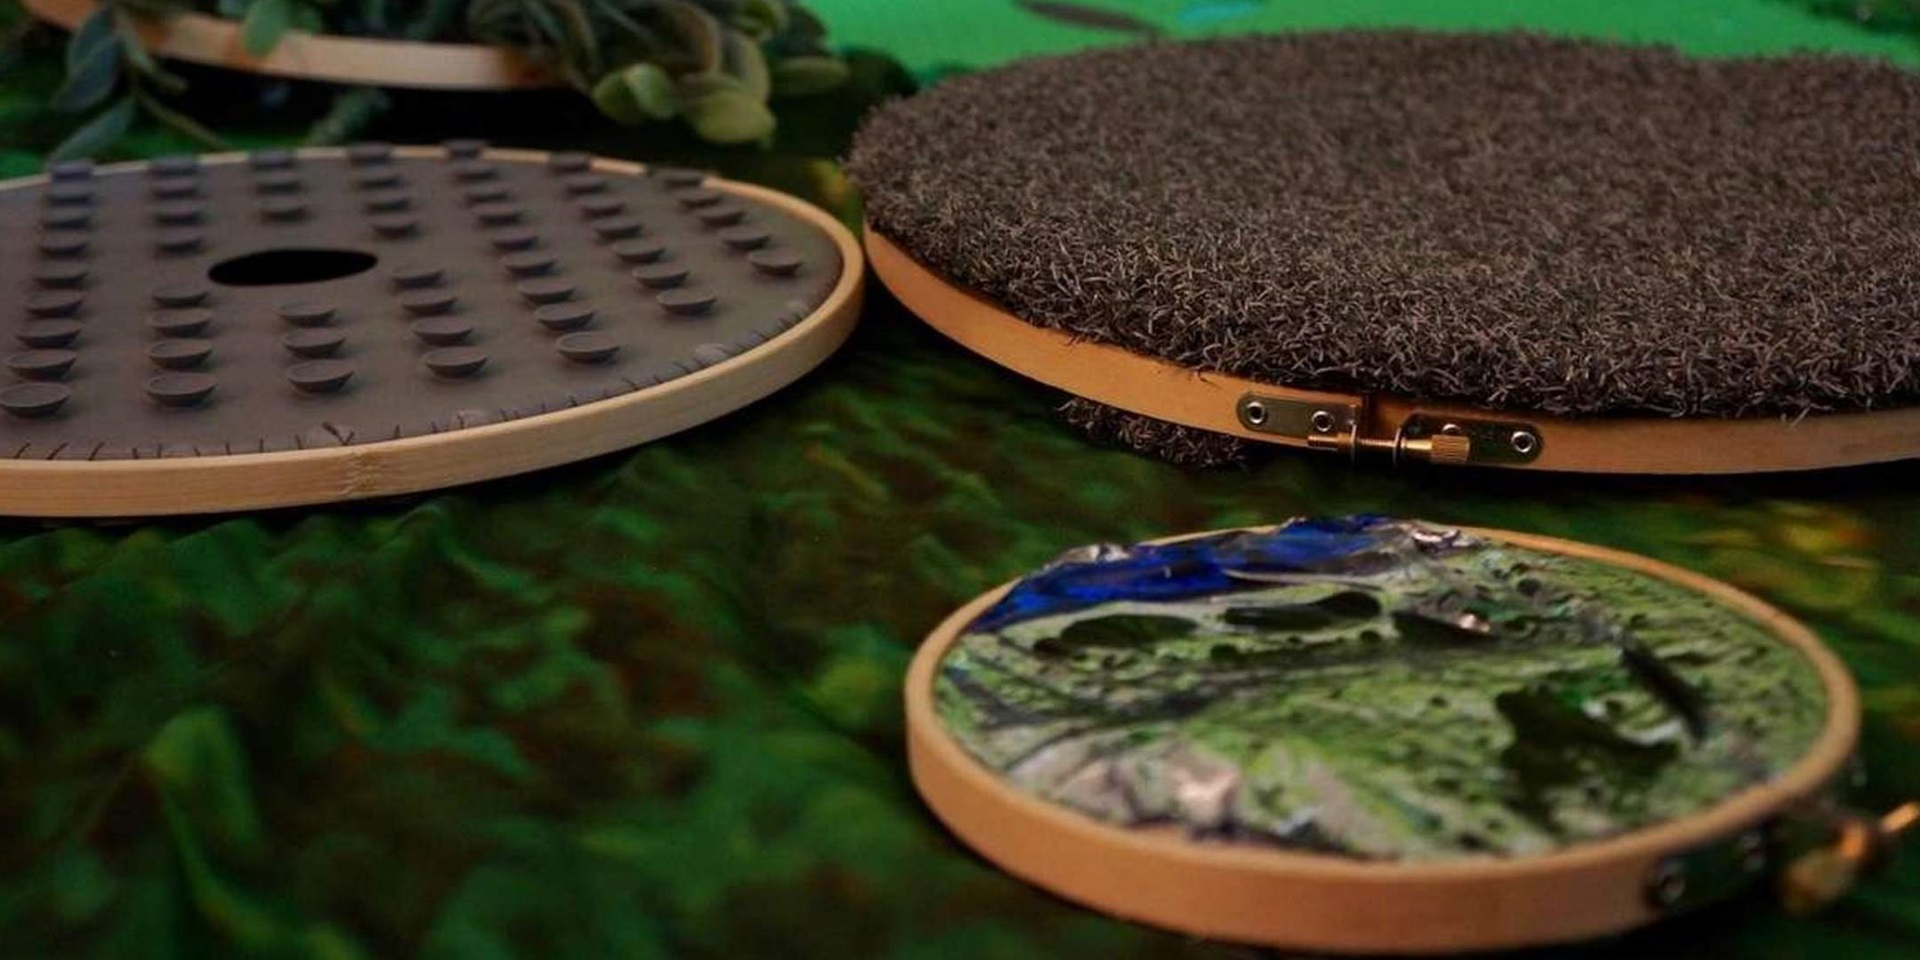
Unconventional materials hoops
The great thing about these is they could contain almost anything. Household objects are the source of many great textures we’ve chosen to use.


Step 1
Trace the shape of your hoop onto the unconventional materials, ensuring you leave a 2-3 cm margin for stretching the fabric over the inner hoop. For thicker materials like door mat and place mat, allow 3-5 tabs to tuck the fabric onto the hoop.


Step 2
Cut out your circular shapes, stretch them over the inner hoop and expand the outer hoop over the top, twisting the screw closed until it’s very firm. For slippery rubbery textures like the bath mat, we chose to hand stitch the panel onto the inner hoop first with heavy upholstery thread. For more sturdy rigid materials like the placemat, we used cable ties to secure it.
For loose textures like the faux plants we positioned plants on the inner hoop and used elastic to weave and tie the plants on before affixing the outer ring.
Shibori stones hoop

Shibori stones hoop. Image: Annalice Creighton / ANMM.
This technique is inspired by the preparation done to fabrics about to undergo shibori dyeing or thermoplastics steaming, using beads, buttons or stones and string to create a resist. It’s quite sculptural and fun to play with in-and-of itself. A large square of fabric quickly becomes a small scrap once wrapped around beads, so ensure your starting point is about 4 times the diameter of your hoop.
Step 1
Choose a generously sized piece of fabric and start wrapping a section of it over a stone. Stitch into place with strong thread, wrapping it around the stone 2-3 times between stitches. Add more stones one by one until you’ve created the desired texture.
Step 2
Stretch the fabric over the inner hoop and throw a few stitches to secure. Then affix the outer hoop.


The squishy hoop

The squishy hoop. Image: Annalice Creighton / ANMM.
Step 1
Place the metallic foil, a generous squirt of baby oil and a good few dollops of food dye into the zippy bag (glitter works well in there too and if you don’t have baby oil, hair gel is just as good).
Step 2
Try to push as much air out as possible then seal the bag and wrap the top with duct tape, fold over 3 times and wrap again ( once played with for a while that oil may just find its way out of the bag so an even better option is using water bladders as they have a more secure closing, but zippy bags are fine for gentle use).
Step 3
Arrange the scene over the inner hoop, stretch on the outer hoop and secure it.
Tape the excess corners of the bag to the back with gaffer tape.


Sensory Stepping Stones and Rugs

Creating sensory stepping stones and rugs. Image: Annalice Creighton / ANMM.
You will need:
- Smooth stones (available from hardware stores)
- EVA foam mats or cork kitchen mats
- Textured Bath mats
- Dish-cleaning brushes/ Silicone pot holders/ sponges/ loofahs, rope or other great textured materials
- Scissors
- Craft knife
- Heavy darning needle and upholstery thread
- Clear liquid nails
- Cable ties
Creating
Choose your texture. Some things are best placed in, others on the mats. For the stones these are best glued onto the mats with a clear construction adhesive. For the furry/ silicon texture we cut shapes into the foam mat first and laid these inside the negative spaces like a puzzle, securing at the back with liquid nails. For the larger more sculptural items we affixed by threading onto the mats with cable ties.


There you have the beginnings of our wild sensory forest*.
And to add to the magic, we’re also making…
- Projection torches (same craft as the mini planetarium but this time we made animal shadow discs).
- Sensory pillows (pillow cases filled with scrunchy paper, squishy bubble wrap, bobbly ball pit balls, foam, musical instruments and scarves).
- Sensory tent (A pop-up beach tent and a mosquito net with some strewn fabrics and LED lights).
- Glowing mats (LED rope light woven into a coiled rug with awning rope).
*And lastly a note about safety with our sensory forest resources. These are designed to be enjoyed in a very closely supervised environment as part of facilitated play. We’ve used fairly industrial strength fittings for securing loose items but babies and toddlers may still pry some of these fittings loose over time so it’s important to keep a watch for any loose or broken parts that may become a hazard and remove or repair affected items promptly .